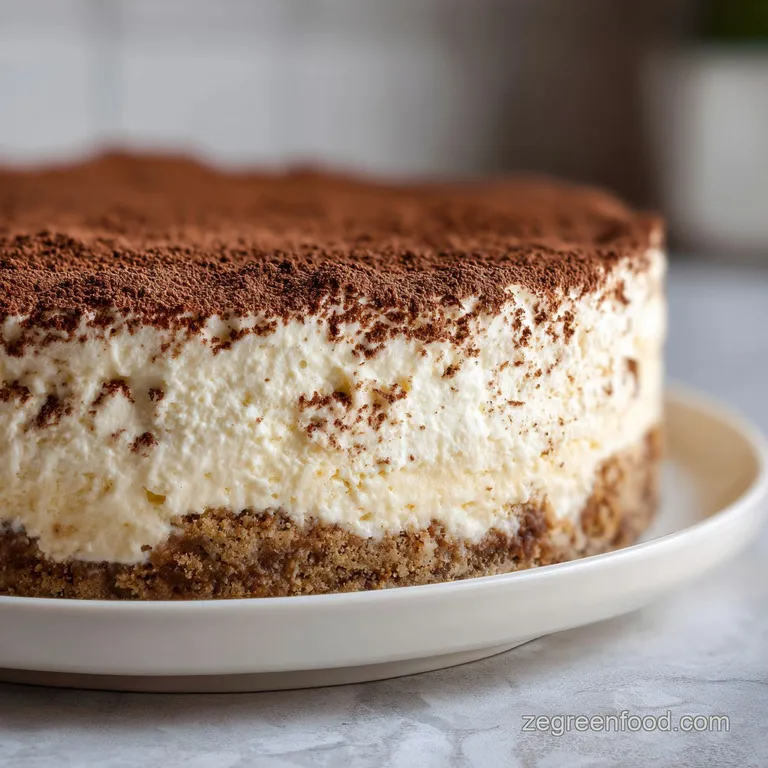
Tiramisu Cheesecake: Creamy and Bold
- Time: Active 30 minutes, Passive 75 minutes, Total 105 minutes
- Flavor/Texture Hook: Silky mascarpone cream meets a bold espresso soaked center
- Perfect for: Family Sunday dinners or impressive holiday dessert spreads
- Achieving the Creamiest Layers in This Tiramisu Cheesecake
- The Specifics of Your Baking Success
- Component Analysis and Selection
- Essential Tools for Professional Results
- Assembling the Layers Step by Step
- Ingredients and Substitutions
- Success Strategies and Troubleshooting
- Adjusting for Different Sizes
- Myth Busting and Kitchen Realities
- Storage Guidelines and Zero Waste
- Enhancing the Serving Experience
- Recipe FAQs
- 📝 Recipe Card
Achieving the Creamiest Layers in This Tiramisu Cheesecake
The first time I pulled this out of the oven, the aroma of dark roast espresso and warm vanilla hit me like a hug from a favorite aunt. I remember standing in my kitchen, hovering over the springform pan with a sifter of cocoa powder, feeling that slight vibration of the counter as the fridge hummed in the background.
There's something almost musical about the way the ladyfingers sound when they hit the espresso - a quick, sharp "hiss" as they drink up the liquid.
Honestly, I used to be terrified of making cheesecake. I thought you needed a degree in engineering to keep the top from splitting like a fault line. But once I realized that a tiramisu cheesecake is really just about managing moisture and temperature, it all clicked.
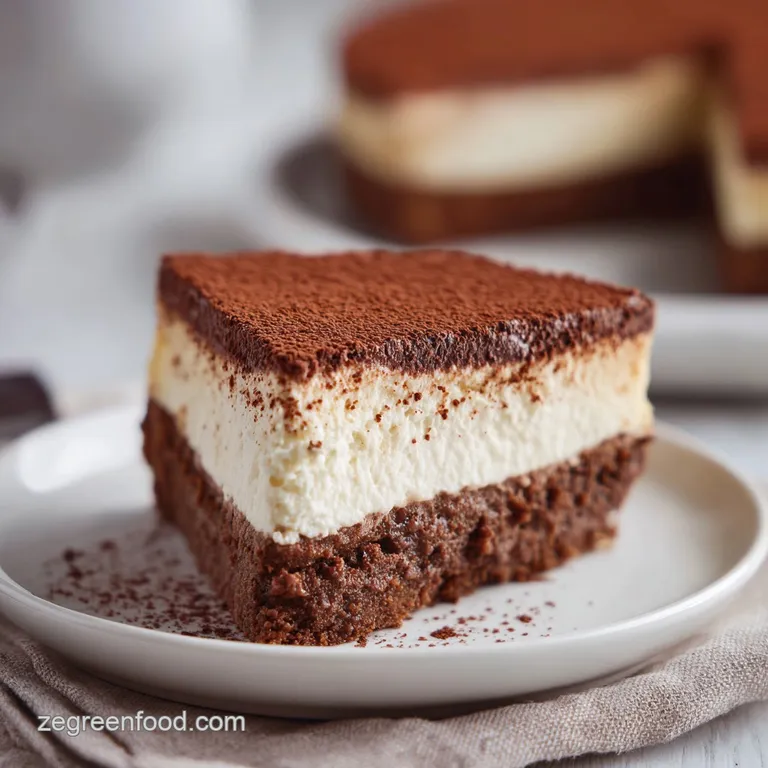
This isn't just a dessert; it's a project that rewards you with these beautiful, distinct layers of chocolatey crust, coffee drenched sponge, and that signature mascarpone tang. It’s the kind of treat that makes everyone at the table go quiet for a second after the first bite.
We’re going for a texture that's substantial but not heavy. Most people make the mistake of overbeating the batter, which turns it into a mousse rather than a proper cake. I've spent enough Sunday afternoons experimenting with different ratios to know that the secret lies in how you handle the mascarpone.
It’s more delicate than standard cream cheese, and if you treat it with respect, it’ll give you a velvety finish that’s absolutely unmatched. Let's get into how we build these flavors, layer by layer.
The Specifics of Your Baking Success
Temperature Syncing: Bringing eggs and cheese to room temperature ensures a smooth emulsion without over mixing. If the fats are cold, they will clump, and you'll be tempted to keep the mixer running, which introduces too much air.
Hydration Control: The 'Flash Dip' method for the ladyfingers prevents them from becoming a soggy mush inside the batter. We want them to hold their shape while still carrying that punchy espresso and rum flavor through the center.
Gradual Cooling: Leaving the cheesecake in a turned off oven with the door ajar allows the proteins to set slowly. Rapid temperature changes cause the cake to contract too quickly, which is the primary reason for those unsightly surface cracks.
Fat Balance: Using a mix of cream cheese and mascarpone provides both structural stability and a rich, buttery mouthfeel. The cream cheese offers the "tang" and height, while the mascarpone adds the luxurious, melt in-the mouth quality.
Oven Baking vs Water Bath Methods
| Method | Time | Texture | Best For |
|---|---|---|---|
| Standard Oven | 60 minutes | Drier, browned edges | Basque style or rustic cakes |
| Traditional Water Bath | 75 minutes | Silky, uniform, pale | Classic Tiramisu Cheesecake |
| Stovetop Steaming | 50 minutes | Very soft, custard like | Individual ramekins |
There is a noticeable difference in how the heat interacts with the proteins depending on the method you choose. While the stovetop or a dry oven might be faster, the water bath provides a gentle, consistent heat that protects the delicate fats in the mascarpone from curdling or separating.
Component Analysis and Selection
| Ingredient | Science Role | Pro Secret |
|---|---|---|
| Mascarpone | Soft Fat | Fold this in by hand to keep the emulsion from breaking under high speed. |
| Espresso | Flavor Solvent | Use a dark roast to ensure the coffee notes aren't lost against the heavy fats. |
| All Purpose Flour | Protein Binder | A small amount of flour helps stabilize the eggs and prevents a "weeping" texture. |
| Large Eggs | Structural Matrix | Crack them into a separate bowl first to avoid shells and ensure they are at room temp. |
Choosing the right ingredients is the difference between a "good" dessert and one that people ask for every year. When you're picking out your ladyfingers, look for the "Savoiardi" style they are harder and hold up better to the espresso dip than the soft, cake like versions often found in grocery store bakeries.
Essential Tools for Professional Results
You don't need a professional kitchen, but a 9 inch springform pan is non negotiable here. I’ve tried making this in a regular cake pan, and it’s a nightmare to get out without ruining those beautiful sides. You’ll also want some heavy duty aluminum foil the wide kind if you can find it.
Standard foil often lets water seep into the crust, which turns your graham cracker base into a soggy mess.
A stand mixer makes the cream cheese step much easier, but a hand mixer works just fine as long as you’re patient. The most important tool is actually a roasting pan large enough to hold the springform pan with plenty of room for water to circulate.
If you don't have a roasting pan, a deep sheet tray can work in a pinch, though you have to be very careful when moving it into the oven so you don't splash yourself with hot water.
Assembling the Layers step-by-step
- Preheat and Prep: Set your oven to 325°F (165°C). This lower temperature is key for a slow, even bake.
- Form the Base: Mix 1.5 cups graham cracker crumbs, 2 tbsp cocoa powder, 1 tbsp sugar, and 6 tbsp melted butter. Press firmly into the bottom of the springform pan. Note: Using the bottom of a flat measuring cup helps get an even, compacted crust.
- Initial Bake: Bake the crust for 10 minutes until it smells like toasted chocolate. Let it cool completely before wrapping the pan in three layers of foil.
- Cream the Cheese: Beat 16 oz cream cheese and 1 cup sugar until completely smooth and glossy. This usually takes about 3-4 minutes on medium speed.
- Integrate Mascarpone: Gently fold in 8 oz mascarpone by hand or on the lowest mixer setting. Note: Over mixing mascarpone can cause it to turn grainy or oily.
- Add the Bindings: Mix in 3 eggs one at a time, followed by 1 tsp vanilla and 2 tbsp flour. Stop as soon as the yellow streaks disappear.
- The Inlay Layer: Pour half the batter into the pan. Dip 14 ladyfingers into a mix of 0.5 cup espresso and 2 tbsp rum for exactly 1 second per side, then lay them on the batter.
- Final Pour: Cover with the remaining batter and smooth the top. Place in a roasting pan filled with hot water halfway up the sides.
- The Long Bake: Bake for 1 hour 15 minutes until the edges are set but the center still wobbles like Jello.
- Cool and Set: Turn off the heat and crack the door. Let it sit for 1 hour. Chill for at least 6 hours (overnight is better) before topping with whipped cream and cocoa.
Ingredients and Substitutions
- Graham Cracker Crumbs (1.5 cups): Use crushed Biscoff cookies for a spiced, caramelized vibe. Why this? Provides a sturdy, crunchy contrast to the soft filling.
- Mascarpone Cheese (8 oz): Full fat Greek yogurt can work, but the cake will be much tangier and less buttery. Why this? This is the soul of tiramisu flavor.
- Dark Rum (2 tbsp): Brandy or Cognac are excellent alternatives, or use coffee syrup for a non alcoholic version. Why this? Cuts through the richness of the cheese.
- Strong Espresso (0.5 cup): Very strong instant coffee (2 tbsp powder in 0.5 cup water) works if you don't have a machine. Why this? Provides the essential bitter contrast to the sugar.
- Heavy Whipping Cream (1 cup): Ensure it is chilled; warm cream won't hold its peaks. Why this? Adds a light, airy finish to a dense cake.
Success Strategies and Troubleshooting
Preventing Surface Cracks
Cracking usually happens because of two things: over mixing or over baking. When you whip too much air into the batter, it rises like a souffle in the oven and then collapses as it cools, creating tension that snaps the surface.
Similarly, if the internal temperature gets too high, the egg proteins tighten and pull away from each other. Always pull the cake when the center is still jiggly!
Fixing a Grainy Filling
If you notice the batter looking "broken" or grainy after adding the mascarpone, it's likely a temperature issue. Mascarpone has a very high fat content and can split if it’s too cold when it hits the room temp cream cheese.
If this happens, try placing the bowl over a pot of simmering water (not touching the water) for 30 seconds and whisking gently to bring the fats back together.
| Problem | Root Cause | Solution |
|---|---|---|
| Sinking center | Too much air whipped in | Mix on low speed; tap the pan on the counter to release bubbles before baking. |
| Soggy crust | Water leaked into foil | Use extra wide heavy duty foil or place the pan in a silicone cake protector. |
| Rubbery texture | Over baked eggs | Use a meat thermometer; pull the cake when the center hits 150°F (66°C). |
Common Mistakes Checklist
- ✓ Don't skip the water bath; it's the only way to get that professional, silky finish.
- ✓ Pat the ladyfingers quickly; if they soak for more than 2 seconds, they will disintegrate.
- ✓ Ensure all dairy is truly room temperature leave it on the counter for at least 2 hours.
- ✓ Never grease the sides of the pan; the cheesecake needs to "climb" the walls to rise evenly.
- ✓ Let the cake chill for the full 6 hours; the flavor of the espresso needs time to migrate into the cheese.
Adjusting for Different Sizes
If you want to cut this recipe in half for a 6 inch pan, you'll need to be precise. Use 1.5 eggs by beating two together and measuring out half by weight. Reduce the bake time by about 15-20 minutes, but still rely on the "jiggle test" for doneness.
Small pans hold heat differently, so keep a close eye on it starting at the 45 minute mark.
For doubling the recipe to serve a large crowd, don't just throw everything in one giant bowl. It’s better to make two separate batches if you have a standard KitchenAid, as the volume of four 8 oz blocks of cheese can overwhelm a home mixer.
When baking two at once, ensure there is at least two inches of space between the pans in the oven for proper air circulation. Increase the total bake time by about 10 minutes.
Myth Busting and Kitchen Realities
One common misconception is that you must use expensive Italian espresso beans for the ladyfinger soak. While quality matters, the nuances of a single origin bean are often lost once mixed with rum, sugar, and heavy cream.
A standard dark roast or even a high-quality instant espresso powder will give you that "punch" you need without the high price tag.
Another myth is that you can't open the oven door at all during baking. While you don't want to leave it open for long, a quick check at the 60 minute mark to see if the edges are setting won't ruin your cake. The water bath provides enough thermal mass to keep the temperature stable for those few seconds.
The "never open the door" rule is mostly for delicate sponges and souffles.
Storage Guidelines and Zero Waste
Storage: This cheesecake keeps beautifully in the fridge for up to 4 days. In fact, many people (including me!) think it tastes better on day two because the coffee and rum have had time to fully permeate the mascarpone layers.
Keep it tightly covered in plastic wrap or an airtight container to prevent it from picking up "fridge smells."
Freezing: You can freeze the baked and cooled cheesecake (without the whipped cream topping) for up to 2 months. Wrap it in a double layer of plastic wrap followed by a layer of foil. Thaw it overnight in the fridge before adding the fresh cream and cocoa powder.
Zero Waste: If you have leftover espresso, don't pour it down the drain. Freeze it in ice cube trays for iced lattes later in the week. Any broken ladyfingers from the bottom of the package can be toasted and crushed to add extra crunch to the graham cracker crust or used as a garnish for individual pudding cups.
Enhancing the Serving Experience
To get those clean, professional looking slices you see in bakeries, use a long, thin knife dipped in hot water. Wipe the knife clean between every single cut. It sounds tedious, but it prevents the dark espresso layer from smearing into the white cheese, keeping those beautiful interior layers distinct and sharp.
I love serving this with a small glass of Vin Santo or a cold shot of espresso on the side. For a fruity contrast, a handful of fresh raspberries adds a bright acidity that cuts through the intense richness of the mascarpone.
If you’re feeling extra fancy, shave some dark chocolate over the top right before serving to add a bit of texture to the velvety whipped cream. Enjoy every bite you've earned it!

Recipe FAQs
Is it true I must use a water bath to bake this cheesecake?
Yes, this is essential for success. A water bath provides the gentle, consistent heat necessary to achieve a silky texture and prevent the cake from cracking during the 75-minute bake time.
How to avoid soggy ladyfingers in the middle of the cake?
Perform a quick 'Flash Dip' for exactly one second per side. If the ladyfingers soak in the espresso and rum mixture for more than two seconds, they will lose their structure and disintegrate into the batter.
Is it necessary to bring the cream cheese and mascarpone to room temperature?
Yes, it is non-negotiable. Leaving your dairy on the counter for at least two hours ensures a perfectly smooth, lump free batter when you cream it with the sugar.
How to prevent the top of the cheesecake from cracking?
Turn off the oven and let the cake sit inside for one hour with the door slightly ajar. This gradual cooling process prevents the sudden temperature change that typically causes the surface to split.
Is it true that I should grease the sides of the springform pan?
No, this is a common misconception. You must leave the sides ungreased so the cheesecake can properly "climb" the walls of the pan as it rises and bakes, ensuring an even structure.
How to store leftover cheesecake?
Wrap the cake tightly in plastic wrap or place it in an airtight container. It will stay fresh in the refrigerator for up to four days, and the espresso and rum flavors will actually intensify over time.
How to freeze this cheesecake for later?
Wrap the cooled, undecorated cake in a double layer of plastic wrap followed by a layer of foil. You can safely store it in the freezer for up to two months before thawing it overnight in the refrigerator.
Homemade Tiramisu Cheesecake

Ingredients:
Instructions:
Nutrition Facts:
| Calories | 528 kcal |
|---|---|
| Protein | 8g |
| Fat | 38g |
| Carbs | 41g |
| Fiber | 1g |
| Sugar | 27g |
| Sodium | 315mg |
