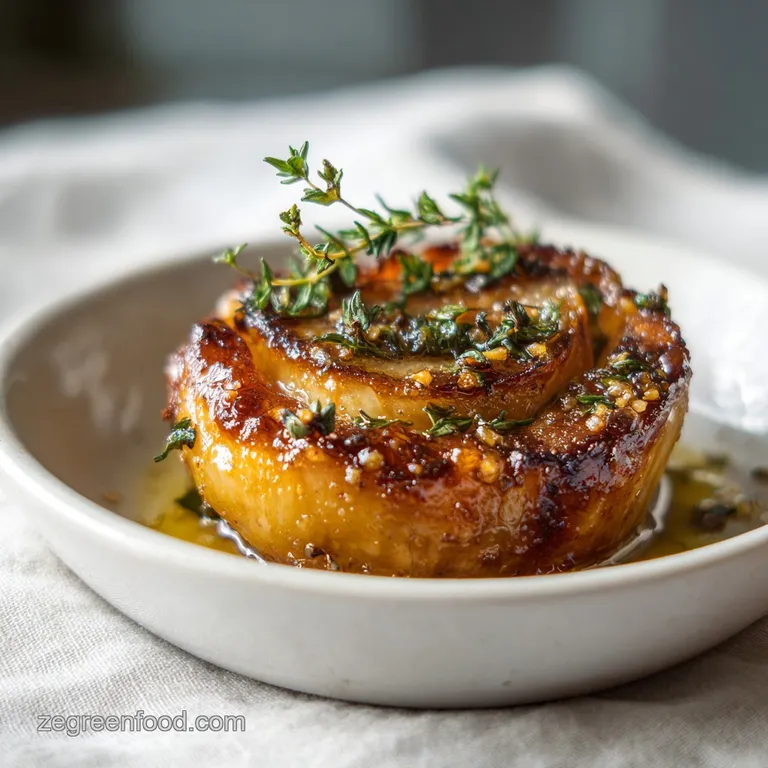
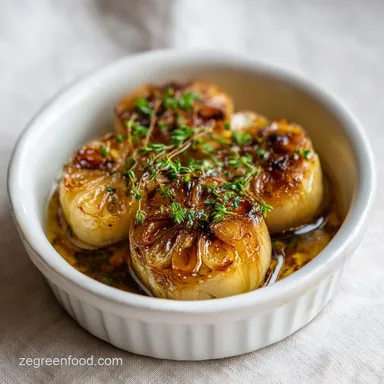
Roasted Garlic Confit: Velvety and Rich
- Time: Active 5 minutes, Passive 120 minutes, Total 125 minutes
- Flavor/Texture Hook: Velvety, rich, and deeply savory
- Perfect for: Weekend meal prep and family style Italian dinners
- How to Make Silky Roasted Garlic Confit
- Critical Specifications for Success
- Scientific Foundations for Better Flavor
- Essential Components and Smart Swaps
- Required Tools for the Job
- Step by Step Roasting Directions
- Troubleshooting Common Cooking Errors
- Creative Variations and Recipe Twists
- Scaling the Recipe for Crowds
- Debunking Common Garlic Myths
- Best Practices for Cold Storage
- Serving Suggestions and Pairing Ideas
- Recipe FAQs
- 📝 Recipe Card
How to Make Silky Roasted Garlic Confit
Have you ever tried to sauté garlic for a quick pasta, got distracted for exactly four seconds, and ended up with those tiny, bitter black specks that ruin the entire pan? It is heartbreaking. That acrid, metallic taste is the ultimate mood killer for a home cook.
For years, I struggled with getting that deep, mellow garlic flavor without the risk of burning it or dealing with the harsh "garlic breath" that lingers for days. I wanted that soft, jammy texture you get at high end Italian spots, but my attempts on the stovetop always resulted in cloves that were either half raw or unpleasantly rubbery.
The real solution isn't a better frying pan; it is a total shift in technique. We are moving away from the aggressive heat of a skillet and into the gentle, insulating embrace of a low temperature oven. This recipe for Roasted Garlic Confit is designed to fix every "garlic fail" you have ever had.
By submerging the cloves completely in oil, we create a thermal buffer that prevents the garlic from ever reaching that scorched, bitter stage. Instead, the cloves undergo a slow, beautiful transformation into something so soft you can spread it with a butter knife.
When you pull that ramekin out after 120 minutes, the aroma is enough to make the neighbors knock on your door. You are left with two prizes: the cloves themselves, which are like savory candy, and the infused oil, which is basically liquid gold.
Whether you are folding these into mashed potatoes or smearing them on a charred piece of sourdough, this method is the ultimate "set it and forget it" trick that makes everything in your kitchen taste like you spent hours on it.
Critical Specifications for Success
- Alliinase Inactivation: Gentle heat stops the enzymatic reaction that creates "sharp" garlic flavors, leaving only sweetness.
- Lipid Extraction: The olive oil acts as a solvent, pulling fat soluble flavor compounds out of the garlic and into the surrounding liquid.
- Cellular Softening: A long, 120 minutes poach breaks down the pectin in the garlic cell walls without evaporating internal moisture.
- Maillard Progression: At 120°C (250°F), we achieve a very slow caramelization that develops golden colors without the carbonization that causes bitterness.
| Garlic Size | Oven Temp | Cook Time | Finished Texture |
|---|---|---|---|
| Small Cloves | 120°C | 90 minutes | Soft and jammy |
| Jumbo Cloves | 120°C | 120 minutes | Velvety and spreadable |
| Whole Heads | 120°C | 135 minutes | Extra caramelized |
Choosing the right size of cloves dictates how much time the heat needs to penetrate the center. Smaller cloves will finish faster, so keep an eye on the color after the 90 minute mark to ensure they don't turn too dark.
Scientific Foundations for Better Flavor
Understanding how heat interacts with the garlic helps us avoid the common pitfalls of home cooking. When we poach the garlic at exactly 120°C (250°F), we are working in a specific temperature window where the sugars in the garlic begin to brown very slowly.
If we went higher, the oil would bubble too vigorously, essentially deep frying the garlic and making the exterior tough and crusty instead of silky.
| Ingredient | Science Role | Pro Secret |
|---|---|---|
| Garlic Cloves | Flavor Base | Trim the root ends to allow oil to penetrate the core during the long 120 minutes bake. |
| Extra Virgin Olive Oil | Heat Conductor | Use a high-quality oil; it absorbs the garlic essence and becomes a secondary ingredient for dressings. |
| Sea Salt | Moisture Draw | Salt helps break down the cellular structure of the garlic while intensifying the natural sugars. |
The oil serves a dual purpose: it regulates the temperature and prevents oxygen from reaching the garlic during the cook. This prevents the garlic from drying out, ensuring that every clove remains plump and luscious. This is why it is vital that the oil covers the cloves by at least half an inch.
Essential Components and Smart Swaps
Getting the ingredients right is the difference between a good condiment and a kitchen staple you will crave every week. Stick to fresh, firm garlic rather than the pre peeled bags if you want the most intense flavor, though the pre peeled ones work in a pinch for convenience.
- 250g garlic cloves (approx 3-4 whole heads) Why this? Provides the perfect ratio for the 350ml of oil to ensure full submersion.
- Substitute: Pre peeled cloves. Note: These are milder and might cook 10 minutes faster.
- 350ml (1.5 cups) extra virgin olive oilWhy this? Its low smoke point is perfect for this low temp poaching method.
- Substitute: Avocado oil. Note: Very neutral flavor, won't solidify as much in the fridge.
- 0.5 tsp sea saltWhy this? Fine grains dissolve better into the oil and garlic during the long roast.
- Substitute: Kosher salt. Note: Use 1 full teaspoon as it is less dense than sea salt.
- 2 sprigs fresh rosemary or thymeWhy this? Adds a woody, earthy aromatic layer to the oil.
- Substitute: Dried bay leaves. Note: Provides a subtle, floral savory note without the piney rosemary flavor.
- 1 tsp black peppercornsWhy this? Infuses the oil with a slow, back of-the throat heat.
- Substitute: Red pepper flakes. Note: Will make the oil significantly spicier; use only a pinch.
Required Tools for the Job
You don't need a lot of fancy gear, but the material of your vessel matters. A heavy bottomed saucepan or a thick ceramic ramekin is essential because they hold heat steadily. Thin metal pans can have "hot spots" that might scorch the cloves touching the bottom.
If you have a small cast iron cocotte, that is the gold standard for this recipe. It distributes the heat so evenly that the garlic cooks at the exact same rate from the center to the edges. Also, make sure you have a sterilized glass jar ready for the cooling phase.
Using a clean jar is the most important step for food safety when storing any oil based infusion.
step-by-step Roasting Directions

- Prep the garlic. Peel 250g of garlic cloves and trim the tough brown root ends off each one. Note: Trimming allows the oil to soak into the garlic more effectively.
- Combine aromatics. Place the peeled cloves, 0.5 tsp sea salt, 2 sprigs of rosemary, and 1 tsp peppercorns into your small, heavy bottomed oven safe vessel.
- Submerge in oil. Pour 350ml of extra virgin olive oil over the mixture. Wait until the garlic is covered by at least half an inch of oil.
- Preheat and stabilize. Set your oven to 120°C (250°F). Note: This low temperature is the secret to the velvety texture.
- Start the roast. Place the vessel on a baking sheet (to catch any stray drips) and slide it into the center of the oven.
- Monitor the poach. Roast for 1.5 to 2 hours. Look for the cloves to turn a pale golden blonde.
- Test for doneness. Pierce a clove with a toothpick; it should slide in with absolutely no resistance, like poking through soft butter.
- Cool safely. Remove from the oven and let the entire vessel sit on the counter until the oil reaches room temperature.
- Store and chill. Transfer the garlic and oil into a sterilized glass jar and place it in the refrigerator immediately.
Troubleshooting Common Cooking Errors
Why Your Garlic Turned Brown and Bitter
If your cloves look dark brown or "toasted," the oven temperature was likely too high or the vessel was too thin. When garlic gets too dark, the sugars have moved past caramelization and into carbonization, which tastes acrid. Even if the oven says 120°C, it might be running hot.
Why the Oil Is Cloudy in the Fridge
Don't panic! This is completely normal for high-quality extra virgin olive oil. The fats in the oil solidify at cold temperatures, creating a cloudy, thick appearance. If you want to use the oil for a dressing, just take the jar out of the fridge for 10 minutes, and it will become liquid gold again.
| Problem | Root Cause | Solution |
|---|---|---|
| Rubbery Cloves | Cooked too fast or not long enough | Ensure temperature is 120°C and cook for the full 120 minutes. |
| Burned Bottoms | Thin metal pan used | Use a ceramic or cast iron dish to buffer the heat. |
| Rancid Flavor | Old oil or room temp storage | Always use fresh oil and move the jar to the fridge immediately after cooling. |
Common Mistakes Checklist
- ✓ Pat the garlic dry if you washed it; water in the oil can cause splattering and spoilage.
- ✓ Never leave the confit on the counter overnight; botulism thrives in room temperature, low oxygen oil environments.
- ✓ Don't skip the trim; those woody ends stay tough even after two hours of roasting.
- ✓ Avoid using high heat to "speed things up" you will end up with fried garlic, not confit.
- ✓ Use a vessel that is just large enough for the garlic; too much surface area leads to unnecessary oil evaporation.
Creative Variations and Recipe Twists
If you want to move beyond the classic herb infused version, there are so many ways to play with the flavor profile. One of my favorites is adding a teaspoon of smoked paprika and a dried chipotle pepper to the oil before roasting. This creates a smoky, spicy garlic confit that is incredible when folded into a roasted chickpea bowl for a quick lunch.
For a more Mediterranean vibe, you can swap the rosemary for lemon peel strips and dried oregano. This version is much brighter and works perfectly as a base for a vinaigrette. If you are feeling adventurous, try adding a cinnamon stick and a few cloves for a Moroccan inspired aromatic profile that pairs beautifully with roasted lamb or starchy vegetables.
Using the Air Fryer Shortcut
If you don't want to turn on the big oven for two hours, you can use an air fryer. Place your garlic and oil in a small, heat proof cake pan or ramekin that fits inside the basket. Set the air fryer to 120°C and check it after 45 minutes.
Because air fryers circulate heat more efficiently, the "Garlic Confit Air Fryer Recipe" usually cuts the time in half, but you must be careful the top cloves can brown too quickly if they aren't fully submerged.
| Method | Time | Texture | Best For |
|---|---|---|---|
| Oven | 120 minutes | Uniformly silky | Large batches, maximum flavor |
| Air Fryer | 45 minutes | Slightly firmer | Quick fixes, small portions |
| Stovetop | 60 minutes | Variable | Only if you have a very reliable low simmer burner |
Scaling the Recipe for Crowds
This recipe is incredibly easy to double or triple, provided you have a large enough oven safe dish. If you are doubling the garlic to 500g, you will need to increase the oil to about 600ml to ensure the cloves stay submerged.
When scaling up, I find that the salt should only be increased by about 1.5x rather than a full double, as the garlic's natural flavor is quite potent on its own.
When halving the recipe, use a very small ramekin. If the dish is too wide, the oil will be too shallow, and your garlic will stick out like little islands and burn. The cook time remains largely the same about 120 minutes even for smaller batches, because the temperature is so low that it takes that long for the cellular structure to break down regardless of the volume.
Debunking Common Garlic Myths
Many people believe that you can store garlic confit on the counter like you would plain olive oil. This is a dangerous misconception. Because garlic grows in the soil, it can carry spores of Clostridium botulinum. These spores love the low oxygen environment of an oil jar.
Without the acidity of vinegar or the cold of a fridge, they can produce toxins. Always, always refrigerate your confit and use it within two weeks.
Another myth is that you need to "blanch" the garlic in boiling water before roasting to remove bitterness. While this is a French technique used for raw garlic garnishes, it is completely unnecessary for a 120 minutes roast.
The low and slow heat in the oven does all the heavy lifting to mellow out the pungency naturally.
Best Practices for Cold Storage
Storage is the most critical part of this process. Once the oil has reached room temperature, move it to the fridge immediately. The cloves will stay good for up to 2 weeks. If you find yourself with more than you can eat in that time, you can actually freeze garlic confit!
I like to spoon the cloves and a bit of oil into an ice cube tray. Once frozen, pop the cubes into a freezer bag. They will keep for up to 3 months and can be dropped directly into a hot pan for a quick flavor boost.
Don't waste a single drop of the leftover oil. It is infused with the essence of roasted garlic and herbs. I use it to sauté vegetables, as a base for my creamy tomato soup, or even to popcorn for a savory snack. If you have herb stems or lemon peels left over from other recipes, you can toss those into the oil while it's still warm to squeeze every bit of value out of your ingredients.
Serving Suggestions and Pairing Ideas
The most classic way to enjoy this is as a garlic confit spread. Simply take a few cloves, smash them with a fork into a paste, and spread them over a piece of crusty baguette that has been toasted until it is ready to shatter. The contrast between the crunchy bread and the velvety garlic is pure comfort food.
If you are looking for a main course, whisk a few tablespoons of the infused oil with four mashed cloves and some pasta water to create a "liquid gold" sauce for linguine. It is also a game changer when folded into vegan mashed potatoes or drizzled over roasted root vegetables.
I have even been known to use the cloves as a pizza topping, where they get a second hit of heat and become almost like savory jam. Trust me, once you have a jar of this in your fridge, you will find yourself reaching for it every single time you cook.

Recipe FAQs
Is garlic confit the same as roasted garlic?
No, they are distinct techniques. Roasted garlic is dry-roasted at a high heat to achieve a caramelized, jammy texture, whereas confit slowly poaches the cloves in olive oil to create a buttery, melt-in-your mouth consistency.
How long do you confit garlic in the oven?
Roast for 1.5 to 2 hours. You will know they are finished when the cloves are a pale golden blonde and offer no resistance when pierced with a toothpick.
What does it mean to confit garlic?
Confit means to cook something slowly in fat at a low temperature. By submerging the garlic in extra virgin olive oil and heating it at 250°F (120°C), you preserve the delicate flavor while transforming the texture into a soft, spreadable paste.
Is eating garlic confit good for you?
Yes, garlic is packed with beneficial compounds. While it is rich in heart healthy fats from the olive oil, it maintains its nutritional integrity through the gentle, low-temperature poaching process.
How to ensure the garlic does not burn during cooking?
Submerge the cloves in at least half an inch of oil. This oil barrier prevents the garlic from being exposed to direct, dry heat, allowing it to poach evenly without turning bitter or brown.
Is it true that I can leave the jar on the counter after cooking?
No, this is a common misconception and a serious food safety risk. You must allow the oil to cool to room temperature and then transfer the mixture to a sterilized jar for immediate refrigeration to prevent the growth of bacteria.
How to use the leftover oil after the garlic is gone?
Use the infused oil in dressings or sautés. If you enjoyed the flavor infusion process here, you can apply this same principle by using the garlic scented oil to boost the depth of savory pasta dishes.
Roasted Garlic Confit
Ingredients:
Instructions:
Nutrition Facts:
| Calories | 100 kcal |
|---|---|
| Protein | 0.5 g |
| Fat | 10.1 g |
| Carbs | 2.6 g |
| Fiber | 0.2 g |
| Sugar | 0.1 g |
| Sodium | 36 mg |
