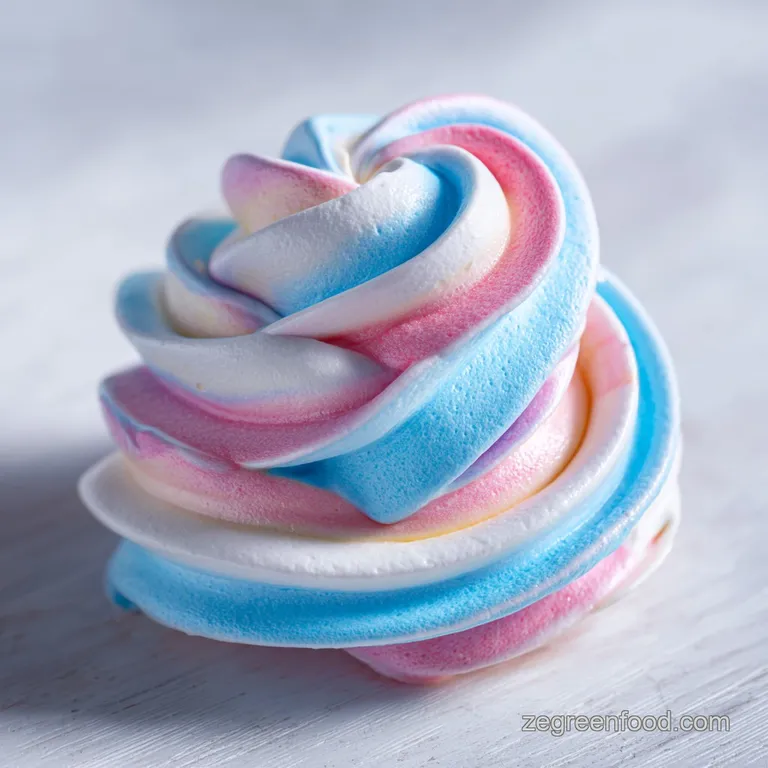
Vegan Royal Icing: Firm and Glossy
- Time: Active 10 minutes, Passive 0 minutes, Total 10 minutes
- Flavor/Texture Hook: Velvety smooth finish with a crisp, sugary shatter
- Perfect for: Holiday cookie decorating, wedding favors, and intricate piping projects
- Achieving the Perfect Vegan Royal Icing Recipe Finish
- Essential Metrics for Successful Eggless Cookie Decorating Results
- Selecting the Best Components for a Silky Smooth Texture
- Professional Tools Required for Flawless Icing Application Every Time
- Mastering the Mixing Process for Durable and Glossy Surfaces
- Common Mistakes and How to Fix Separation or Bubbles
- Troubleshooting Common Issues
- Simple Ingredient Swaps for Diverse Dietary and Allergy Needs
- Best Practices for Maintaining Freshness and Preventing Hardening
- Creative Ways to Use This Decorative Frosting on Treats
- Recipe FAQs
- 📝 Recipe Card
Achieving the Perfect Vegan Royal Icing Recipe Finish
I remember the first time I stood over my stand mixer, staring down a bowl of murky, slightly beige liquid from a can of chickpeas. It felt like a kitchen prank. My friend had insisted this "aquafaba" would magically turn into the snowy, stiff peaks required for a vegan royal icing recipe, but I was skeptical.
I started the mixer, and for the first minute, nothing happened. Then, the rhythmic whirring changed pitch. The liquid began to pale, then froth, and suddenly, it was a mountain of pearlescent white foam that looked exactly like the egg based versions I grew up making with my grandmother.
The transformation is honestly hypnotic. You go from a liquid that smells faintly of legumes to a bowl of pure, sweet scented clouds. The real magic happens when you add the sugar and watch the mixture tighten into a glossy, thick paste.
I once made the mistake of not sifting my sugar, thinking I could whisk out the lumps later. Big mistake. I spent the next hour unclogging my piping tips with a safety pin, nearly losing my mind. Now, I never skip the sieve.
That silky, velvety flow is what makes the difference between a cookie that looks homemade and one that looks like it belongs in a boutique bakery window.
We are aiming for that specific structural integrity that allows you to pipe a border around a star or a heart without it sliding off the edge. It needs to be firm enough to hold its shape but fluid enough to settle into a smooth, mirror like surface when you "flood" the center.
This recipe hits that sweet spot every single time. Whether you are prepping for a massive holiday bake off or just want to make a few treats for the family, this method is your new best friend. Trust me, once you see that first cookie dry to a hard, porcelain like finish, you will never go back to the egg based stuff.
Essential Metrics for Successful Eggless Cookie Decorating Results
Building the perfect texture in this icing requires understanding how the proteins in the aquafaba interact with the stabilizers. It is not just about mixing things together, it is about creating a stable structure that can support the weight of the sugar without collapsing into a puddle.
- Protein Denaturation: The rapid whisking of aquafaba unfolds its proteins, creating a network that traps air bubbles to form a stable foam.
- Acidic Stabilization: Cream of tartar lowers the pH of the mixture, which strengthens the protein bonds and prevents the foam from deflating.
- Crystalline Suspension: Powdered sugar provides the bulk and structure, staying suspended in the foam to create a solid finish once the moisture evaporates.
- Hygroscopic Retention: The small amount of corn syrup keeps the icing from becoming too brittle, ensuring it has a slight "give" rather than crumbling into dust when bitten.
| Consistency Level | Usage Purpose | Visual Cue | Setting Time |
|---|---|---|---|
| Stiff Peaks | Fine detail, flowers | Holds sharp points | 15 minutes |
| Piping Consistency | Outlining, lettering | Soft peaks that curl | 10 minutes |
| Flood Consistency | Filling large areas | Disappears in 10 seconds | 5 minutes |
Choosing the right consistency before you start piping is the most important decision you will make in this process. Most decorators prefer to keep a "stiff" batch and then thin it down with tiny drops of water as needed for flooding. If you are planning a long afternoon of baking, maybe enjoy a Vegan Tofu Poke Bowl first to keep your energy up before you start the fine motor work of piping.
Selecting the Best Components for a Silky Smooth Texture
The success of this vegan royal icing recipe hinges on the quality of your ingredients. Using a high-quality vanilla extract is vital because there are so few ingredients for the flavor to hide behind.
I prefer a clear vanilla if I want a blindingly white icing, but a pure brown extract adds a warmth that pairs beautifully with gingerbread.
| Ingredient | Science Role | Pro Secret |
|---|---|---|
| Aquafaba | Protein Base | Use the liquid from canned chickpeas for consistent results every time. |
| Cream of Tartar | Structural Binder | This acid prevents the icing from separating or "weeping" after it dries. |
| Powdered Sugar | Body & Hardness | Always use 10x sugar to ensure the particles are fine enough to pipe. |
| Corn Syrup | Gloss & Flexibility | This prevents the icing from drying too matte or cracking prematurely. |
The Ingredient List:
- 6 tbsp aquafaba: This is the liquid from a can of chickpeas. Why this? It mimics egg whites perfectly.
- 0.5 tsp cream of tartar: A mild acid. Why this? It stabilizes the foam structure.
- 4 cups powdered sugar: Sifted, 10x confectioners' sugar. Why this? It provides the essential structure.
- 1 tsp light corn syrup: Optional but recommended. Why this? Adds a professional looking gloss.
- 1 tsp pure vanilla extract: For flavor. Why this? Masks any lingering bean scent.
Chef's Tip: If you find your aquafaba is very watery, simmer it in a pan until it reduces by one third, then cool it completely before using. This concentrates the proteins for an even stronger foam.
| Original Ingredient | Substitute | Why It Works |
|---|---|---|
| Aquafaba | Reduced Pea Protein | Similar protein structure. Note: May have a slightly stronger scent. |
| Cream of Tartar | Lemon Juice | Provides necessary acidity. Note: Use double the amount (1 tsp). |
| Corn Syrup | Agave Nectar | Adds shine and flexibility. Note: Slightly thinner than corn syrup. |
Professional Tools Required for Flawless Icing Application Every Time
You do not need a laboratory full of equipment, but a few specific tools will make your life significantly easier. A stand mixer is the gold standard here because you need to whip the mixture for a full five minutes at high speed.
Doing this with a hand mixer is possible, but your arm will definitely feel the burn by the end.
A clean glass or metal bowl is non negotiable. Any trace of fat or oil on the surface of your bowl will act like a needle to a balloon, popping the air bubbles in your aquafaba and leaving you with a flat, watery mess.
I always wipe my bowl down with a little bit of white vinegar or lemon juice on a paper towel before I start. This ensures the surface is pristine.
For the piping itself, I recommend using tipless piping bags. They allow for much more control, and you can simply snip a tiny hole in the end for fine details or a larger one for flooding. If you prefer metal tips, a #1 or #2 tip is great for outlines, while a #3 or #4 works well for filling in larger shapes.
Keep a damp cloth nearby to wrap around the tips of your bags when you are not using them, as this icing starts to crust over almost immediately when exposed to air.
Mastering the Mixing Process for Durable and Glossy Surfaces

- Clean your bowl. Wipe the bowl of a stand mixer with a drop of lemon juice to remove any fat.
- Combine base liquids. Place the 6 tbsp aquafaba and 0.5 tsp cream of tartar into the bowl. Note: Using a glass bowl helps you see if any sugar is stuck at the bottom.
- Create the foam. Beat on medium high speed for 2 to 3 minutes until a frothy, opaque foam forms.
- Add sugar gradually. Turn the mixer to low and add the 4 cups of sifted powdered sugar one cup at a time.
- Incorporate flavor. Add the 1 tsp vanilla extract and 1 tsp light corn syrup once the sugar is mostly mixed in.
- Final whip. Increase speed to high and whip for a full 5 minutes until the icing is thick and glossy.
- Check consistency. Lift the whisk; the icing should hold its shape without drooping.
- Color the icing. Divide into small bowls and add gel food coloring if desired.
- Adjust thickness. Add water drop by drop for flooding or more sugar for stiffer details.
- Bag it up. Transfer immediately to piping bags to prevent a crust from forming.
The whipping stage is where the magic happens. You want to see that icing turn from a dull white to a brilliant, almost glowing shade. This indicates that you have incorporated enough air to keep it light but enough sugar to keep it strong. If you are looking for another use for aquafaba, check out my Vegan Creme Brulee for a different kind of sweet treat.
Common Mistakes and How to Fix Separation or Bubbles
The most frequent issue people face with a vegan royal icing recipe is the dreaded air bubble. When you whip the icing at high speed, you are forcing air into the structure. This is great for volume, but bad for a smooth finish.
After mixing, I like to take a silicone spatula and "massage" the icing against the side of the bowl for a minute. This pops those tiny bubbles before they ever make it into your piping bag.
Troubleshooting Common Issues
| Issue | Solution |
|---|---|
| Why Your Icing is Runny | If your icing refuses to hold a peak, it usually comes down to one of two things: either you didn't whip it long enough, or there was a trace of fat in your bowl. If you have already whipped it for fi |
| Why Your Icing is Dull | A flat, matte finish usually happens when the icing dries too slowly in a humid environment. To get that high gloss shine, use a small fan or a dehydrator on the lowest possible setting to speed up th |
| Why Your Icing is Cracking | Cracking happens when the icing dries out too quickly or if the layer is too thin. Ensure your flood icing is not too watery. If it looks like colored water, it will likely crack or even flake off t |
Simple Ingredient Swaps for Diverse Dietary and Allergy Needs
While this recipe is naturally vegan and gluten-free, there are ways to adapt it for different needs. If you are avoiding corn, the corn syrup can be replaced or omitted, though the finish will be slightly different.
For those with a legume allergy, you can actually use the liquid from a can of white beans (like cannellini) instead of chickpeas. It is slightly milder in scent and works almost as well.
If you find yourself needing to scale the recipe down because you only have a dozen cookies, it is easy to do. Just remember that the whipping time remains mostly the same. You need those five minutes of high speed action to build the structure, regardless of the volume.
| Need | Modification | Impact on Outcome |
|---|---|---|
| Corn Free | Use Brown Rice Syrup | Same shine but adds a slightly golden tint. |
| Soy Free | Check sugar source | Ensure your powdered sugar is processed without soy. |
| Sugar Reduced | Not recommended | This recipe relies on sugar for its physical structure. |
For a quick alternative method, some people use a "fast" version with just powdered sugar and water, but it never reaches the same professional hardness as this version.
| Method | Time | Texture | Best For |
|---|---|---|---|
| Aquafaba Method | 10 minutes | Hard, glossy snap | Professional decorating |
| Simple Glaze | 2 minutes | Soft, matte finish | Casual family snacks |
Best Practices for Maintaining Freshness and Preventing Hardening
This icing is quite hardy, but it does not like being exposed to air for long periods. If you have leftovers, place them in an airtight container and press a piece of plastic wrap directly onto the surface of the icing before sealing the lid. This prevents that hard crust from forming on top.
- - Fridge
- Keep for up to 5 days. You will need to re whip it briefly by hand before using, as it can separate slightly.
- - Freezer
- I do not recommend freezing the wet icing, as the protein structure of the aquafaba can break down, leading to a grainy texture upon thawing.
- - Zero Waste Tip
- If you have leftover icing in various colors, pipe them into small dots or "sprinkles" on parchment paper. Let them dry overnight, and you have homemade sprinkles for your next cake!
When it comes to the leftover chickpeas from the can, do not toss them! They are perfect for roasting into a crunchy snack or adding to a salad. I often make a batch of Potato Cauliflower Croquettes to serve as a savory appetizer while the cookies are drying.
Creative Ways to Use This Decorative Frosting on Treats
While cookies are the most common canvas, this icing is surprisingly versatile. I have used it to create "glue" for gingerbread houses, and it holds up remarkably well, even under the weight of heavy candy. It is much stronger than a standard buttercream and dries much faster.
One common myth is that you can't get deep colors like red or black with vegan icing. You absolutely can! The trick is to use high-quality gel pastes and let the icing "cure" for a few hours. The color will deepen significantly as it sits. Another myth is that the icing will taste like beans.
Once you add the vanilla and the four cups of sugar, the chickpea flavor completely vanishes. I have served these to dozens of people, and not one person ever guessed the secret ingredient.
Chef's Tip: For a festive twist, add a drop of almond or peppermint extract alongside the vanilla. It adds a wonderful dimension to the flavor profile.
If you are looking for a more decadent dessert to serve alongside your cookies, my Vegan Creme Brulee uses a similar set of ingredients but results in a completely different, creamy texture. Whether you are piping delicate lace patterns or just doing a simple dip and sprinkle, this vegan royal icing recipe provides the reliable, beautiful results every home baker dreams of.

Recipe FAQs
What is a vegan substitute for meringue powder in royal icing?
Use aquafaba. The liquid from a can of chickpeas perfectly mimics the protein structure of egg whites, providing the necessary stability for royal icing without needing specialized powders.
How do you make vegan royal icing?
Beat 6 tablespoons of aquafaba and 0.5 teaspoon of cream of tartar on medium high for 3 minutes until frothy. Lower the speed to incorporate 4 cups of powdered sugar, add 1 teaspoon of vanilla and 1 teaspoon of corn syrup, then whip on high for 5 minutes until glossy and thick.
What is a substitute for eggs in royal icing?
Aquafaba is the direct substitute. It contains proteins that emulsify and foam, much like our creamy coconut milk base creates a stable texture in savory applications.
How to make eggless royal icing?
Combine aquafaba and cream of tartar in a mixer and whip until you reach a stable, foamy consistency. From there, slowly add your powdered sugar and remaining ingredients before finishing with a high speed whip to achieve the final structure.
Is it true you must use eggs to get a hard setting finish?
No, this is a common misconception. When you follow the 5-minute whipping process, the combination of aquafaba, cream of tartar, and sugar sets into a crisp, firm finish that rivals any egg-based version.
How do you prevent air bubbles in the final icing?
Massage the icing against the side of your bowl using a silicone spatula after mixing. This mechanical pressure pops the tiny air bubbles that high speed whipping introduces, ensuring your final work is perfectly smooth.
Can I store this icing for later use?
Yes, keep it in an airtight container at room temperature for up to a few days. If it thickens, simply stir it briefly with a spatula to restore the smooth consistency before using it again.
Vegan Royal Icing Recipe
Ingredients:
Instructions:
Nutrition Facts:
| Calories | 83 kcal |
|---|---|
| Protein | 0.1 g |
| Fat | 0 g |
| Carbs | 21.2 g |
| Fiber | 0 g |
| Sugar | 21.1 g |
| Sodium | 11 mg |
